Introduction
Overview of the TronDesigner integration framework and available developer resources.
🚀 Welcome
Welcome to the TronDesigner Developer Guide. Our integration framework is designed as JSON-first, allowing you to embed a professional design engine into your system.
The Integration Roadmap
Integrating TronDesigner involves three core decisions. Choosing the right path depends on your system architecture and desired user experience.

Integration Architecture
Before diving into the code, use the diagram below to understand the decision flow and data movement between your system and the TronDesigner system.
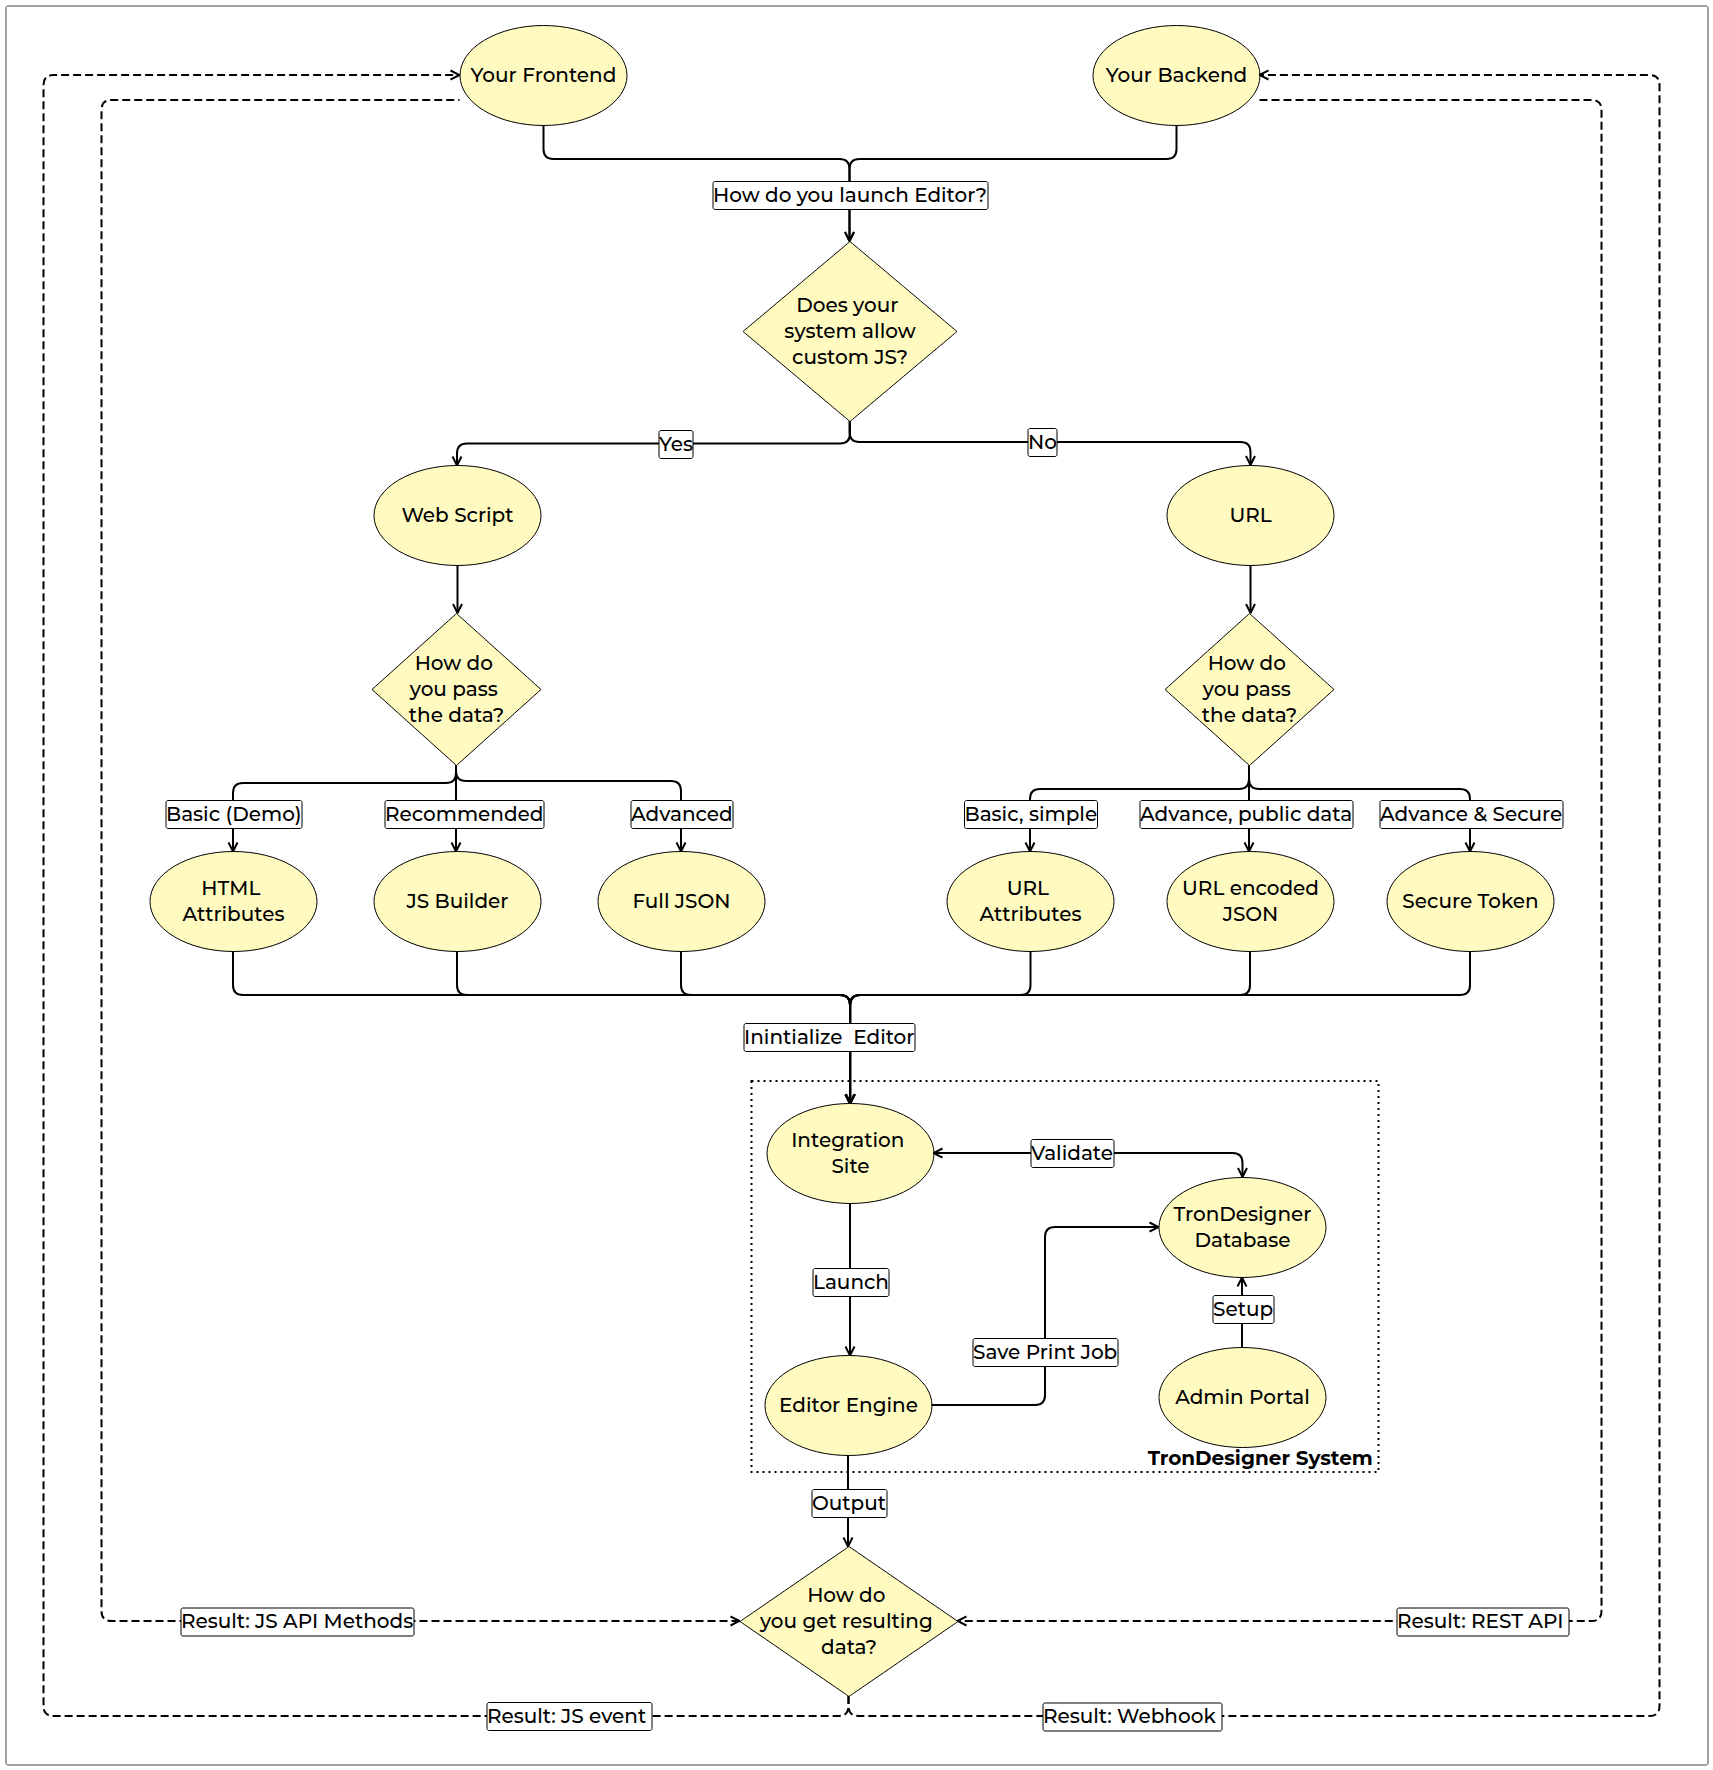
The Decision Roadmap
To navigate the integration, identify your technical constraints and desired automation level:
Does my website allow custom JS?
Yes → Follow the Web Integration Script path for an embedded experience.
No → Follow the Integration via URL path for a direct link/redirect experience.
How do I want to handle outputs?
JS Events Subscriptions for immediate frontend updates.
Webhooks for reliable backend updates.
REST API for on-demand backend automation and data retrieval.
JS API Methods for on-demand frontend automation.
The Integration Steps
The sections below describe the core phases of the TronDesigner integration. Use these steps to evaluate the complexity and technical requirements of each path before making your final decision.
Step 1. Launch Methods
The primary decision is how to invoke the Editor instance. This depends on whether your host system allows you to run custom JavaScript.
There are two primary ways to launch the editor. Both methods eventually deliver a set of Editor Arguments (JSON) that define what the editor should do.
Web Integration Script
(Recommended for Webshop)
You include a script on your website.
Injects a global
window.tronDesignerobject into your frontend.Editor opens as a dialog overlay within your existing page during the chekcout process.
High control, allows for real-time interaction.
Standalone URLs
(Recommended for ERP/CRM)
You generate a unique link.
A standard HTTP redirect or an
<a>tag link to a TronDesigner-hosted environment.Users are redirected to a secure, TronDesigner-hosted page.
Low/Standard control, configuration is passed via URL.
Step 2: Data Input & Configuration
Once you have chosen your launch method, you need to decide how to format and transport the configuration data (how to tell the Editor which product to load). Both launch methods offer three ways depending on complexity, security and required features.
If you chose the Web Integration Script:
HTML Attributes (Basic/Demo): Define settings directly in HTML tags. Best for simple, static buttons.
JS Builder (Recommended): Use our fluent JavaScript API. This is the most readable and flexible way to handle dynamic product data. Recommended for most webshop integrations.
Full JSON (Advanced): Pass a complete configuration object. Best for complex logic.
If you chose Integration via URL:
URL Attributes (Simple, but basic): Pass simple key-value pairs in the query string. Best for quick links. Lower security.
URL Encoded JSON (Advanced, but data are public): Pass an encoded JSON string as a single parameter to handle more complex configurations. Lower security.
Secure Token (Advanced & Secure): Uses a backend-signed token (JWT) to ensure data integrity. Best for production environments handling sensitive data.
Implementation Strategy: While you should only use one transport method for a specific integration point (e.g., your webshop's "Design" button), you can certainly use different methods for different parts of your business.
You might use the Web Integration Script on your public webshop for the best user experience.
Simultaneously, you can use the URL method in your internal ERP or CRM for staff.
The Common Payload: Editor Arguments
Regardless of the "transport" method you choose above, you are always sending the same core data: the Editor Arguments. The JSON object is the "Digital Order Form" you feed to the Editor. This is the schema that defines the editor's behavior. It controls everything:
Opening Modes: Decide if the user is Creating a new design, Editing or Viewing an existing one.
Calling Modes: Choose between Exact (fixed product configuration), Partial (user may complete/change the product configuration), or Own (complete/change the custom product configuration). See more in Calling Modes.
Product Configuration: Define the "canvas." This includes the Product ID, variants, print coordinates and print technologies.
Detailed Reference: All available properties are documented in Editor Arguments.
Step 3: Receiving Results
How will your system know the user is finished and where to find the print files? Once the user saves their design in the Print Editor, you need to retrieve the resulting Print Job GUID and design metadata. There are three ways to retrieve this data:
Which should you use?
For Web Integration Script (JS): Most developers combine JS Events (for a smooth user experience) with Webhooks (for a permanent server-side record).
For Integration via URL: Webhooks and the REST API are essential, as there is no client-side script on your site to catch events .
Next Steps
Choose your starting point based on your integration goal:
Quick Start – Launch quickly a "Hello World" instance.
Web Integration Script – For JS integration as an overlay dialog.
Integration via URL – For integration as a standalone page.
Editor Arguments – Study the "Source of Truth" for all product configurations.
Integration Recipes – Browse copy-paste examples for specific use cases.
Core Resources
Reference materials for deeper technical implementation:
Debugging – Tools for monitoring the integration in real-time.
REST API – For fetching outputs.
REST API Swagger – Detailed endpoint documentation for automation.
JS Events Subscriptions – Overview of available events and their setup.
Webhooks – Set up and manage webhooks for server-side automations.
Full Technical Reference – Auto-generated documentation.